Rudder Pedals
7/5/14 - Drilled (4) holes in the S.S. Piano Hinge (75C-5). Riveted the hinge to the rudder pedal1 (75C3-4) after drilling holes in the rudder pedal. Bent the bottom portion of the hinge around the rudder tube using a vise. Drilled (3) holes in the other half of the hinge and riveted the Toe Brake Pedals (75C3-9) to the hinge after drilling (3) holes in the brake pedals. Repeated the same procedure for the remaining toe brake pedals. Total time = 7 hours.
 |
| Riveting Toe Brakes to the Rudder Pedals |
7/6/14 - Sanded, primed and painted (2) Steering Rods (75C3-10), Control Stick (75C3-2), Elevator Control Tube (75C2-7) and Torque Tube (75C2-5). Total Time = 3 hours.
 |
Preparing the Control Stick for Painting
|
7/11/14 - Removed the MGL Fuel Flow Sender Unit since the Viking View calculates fuel flow. Total Time = 1 hour.
 |
| Finished Pedals |
7/13/14 - Installed rudder pedals onto Central Bearing Supports and Lateral Pedal Bearings. Installed Brake Master cylinders (MC-5) and slave cylinders (MC-4). Installed steering rods to the rudder pedals with associated hardware. Total Time = 4 hours.
 |
| Rudder Pedals Installed |
7/19/14 - Took some time out to travel to Tiny, Ontario, Canada for the 40th anniversary of Zenair which is where the designer of the Zenith aircraft I am building started his business.
 |
| Zenair's Hangar |
 |
| Chris Heintz - Designer of the Zenith CH750 |
7/21/14 - Replaced fuel hose from the fuel filter to the fuel rail with a longer piece of fuel injection hose. Total Time = 2 hours.
 |
| MGL Fuel Flow Sender Removed and Longer Fuel Injection Hose Installed |
7/23/14 - Relocated the ECU from the side wall of the cabin to the firewall rail since it was close to the rudder pedals. Total Time = 3 hours.
 |
| New Location of the ECU Engine Computer |
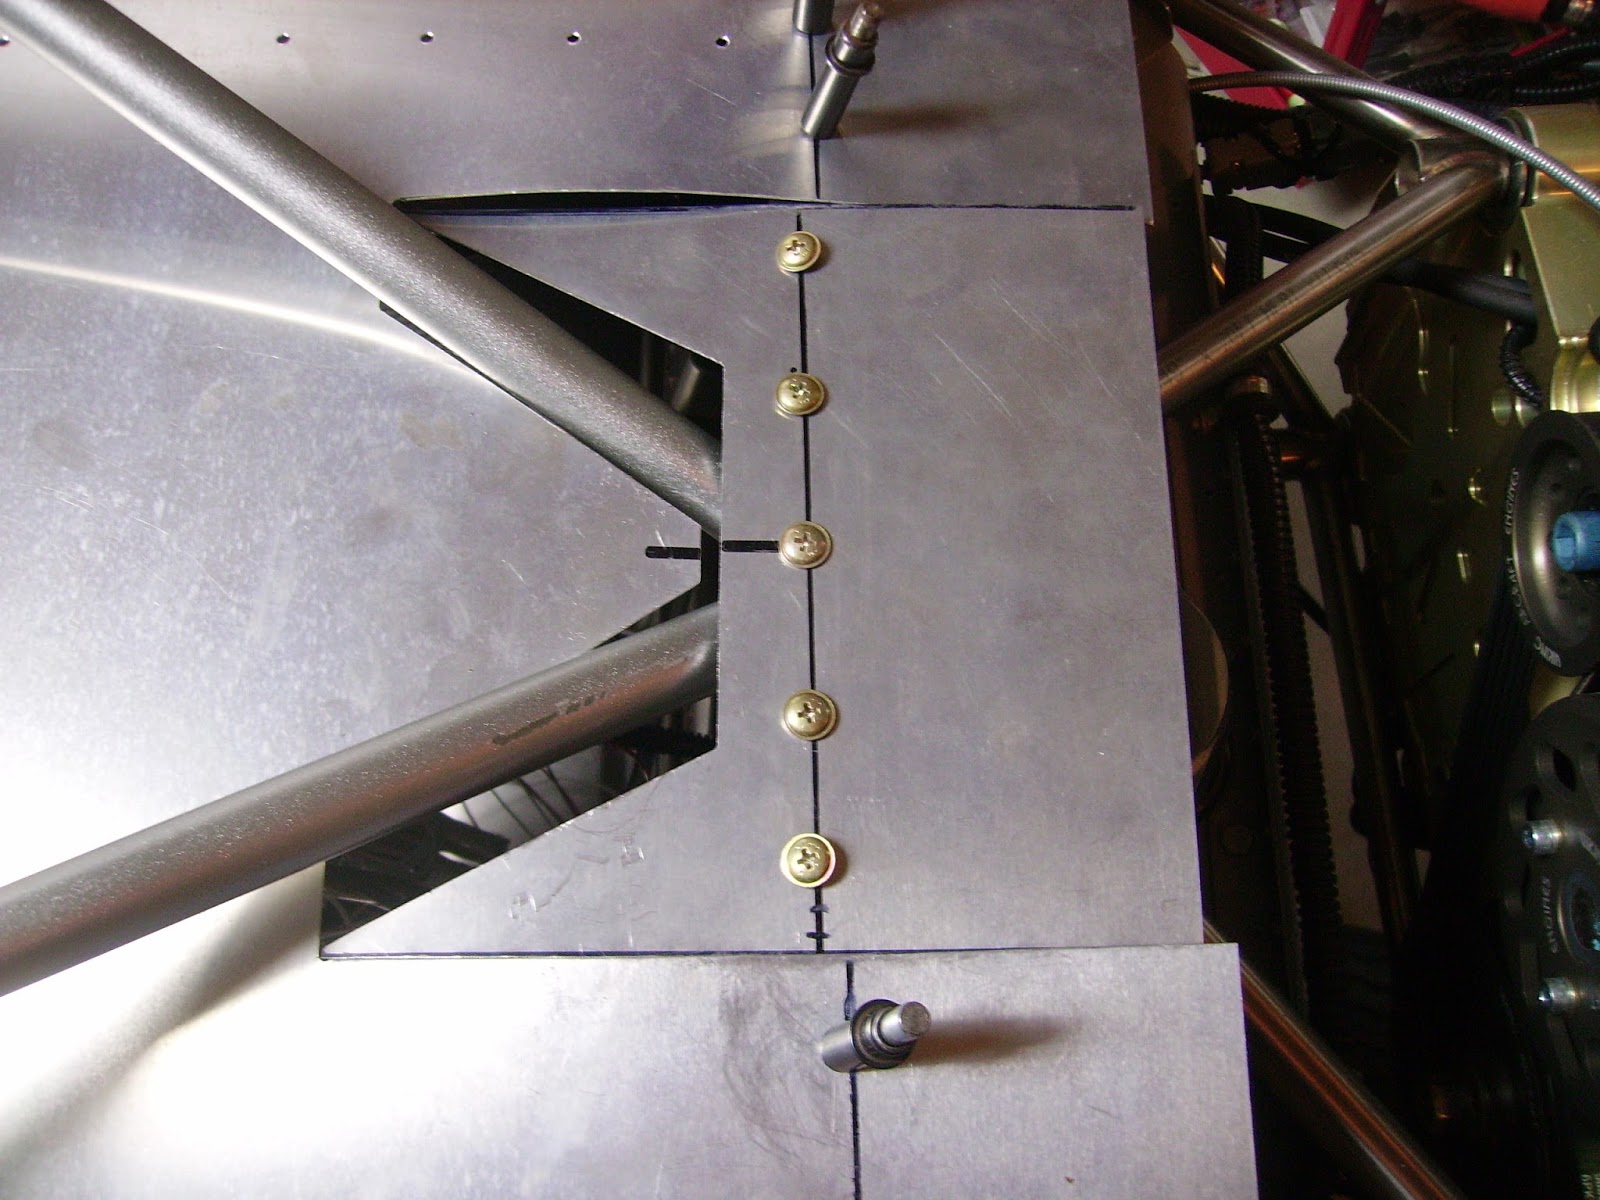
7/27/14 - Installed the Front Torque Tube Bearing Rudder Fairlead (75C4-4) inside the Front Torque Tube Bearing (75C3-1) and secured it with (2) A4 rivets. Centered the Torque Tube (75C2-5) inside of the bearing and then marked and drilled the bolt holes in the side of the bearing. Installed (2) AN3-4 bolts on both sides of the bearing. Drilled (7) holes in the Torque Tube Bearing Supports (75F16-6) and the seat channel to fit an A5 size rivet. Total Time = 3 hours.
 |
| Drilling Holes in the Torque Tube Bearing Supports |
 |
| Front Torque Tube Bearing Installed |
8/3/14 - Mounted the Push-To-Talk (PTT) Button on the end of the plastic cap after soldering the wires to the button. Pushed the plastic cap onto the Foam Handle and feed the PTT wires through the "Y" Tube. Total Time = 3 hours.
 |
| Installed PTT Button onto the End of the Plastic Cap |
 |
"Y" Stick Handles Installed with PTT Buttons
|
 |
| Possible Panel Layout |
8/9/14 - Started to install instruments into the instrument panel. Cut out the holes for the battery switches and the radio and mounted them. Total Time = 4 Hours.
 |
Radio and Battery Switches Installed
|
8/10/14 - Cut out the rest of the holes using a scoring knife, hole punches and step drills. Mounted the instruments into the panel on the bench to see what it looked like. Total Time = 6 hours.
 |
| Cutting Out the Remaining Holes |
 |
| Instruments Installed with Panel on the Bench |
8/16/14 - Installed the instrument Panel in the cabin and mounted the dual throttles after drilling the holes for them. Total Time = 4 hours.
 |
| Panel Mounted in Cabin with Dual Throttles Mounted |
8/23/14 - Started drilling out the holes in the consiole in order to mount the remaining switches, breakers, etc. Total Time = 4 hours.
 |
| Drilling Out the Holes in the Console |
8/24/14 - Mounted switches, breakers and the camera display into the center console and placed console into cabin. Total Time = 4 hours.
 |
Center Console Mounted in Cabin Area
|
8/29/14 - Cut final hole in instrument panel for the transponder with a special hole punch. Total Time = 2 hours.
8/30/14 - Cut vinyl wrap to size for the instrument panel and applied. Cut out the vinyl wrap where the holes are for the instruments. Installed the instruments and installed the panel into the cabin. Total Time = 4 hours.
 |
| Cutting Out Holes in Vinyl Wrap |
 |
| Vinyl Wrap Applied to Instrument Panel |
 |
Finished Instrument Panel Installed in Cabin
|
8/31/14 - Cut vinyl wrap to size for the center console and applied. Cut the vinyl wrap where the holes are for the switches, breakers and gauges. Installed the center console into the cabin. Total Time = 4 hours.
 |
Trimming the Vinyl Wrap on the Center Console
Center Console Installed |
11/1/14 - Removed all wiring from the test panel and began wiring to the instruments mounted in the instrument panel and the center console. Total Time = 4 hours.
11/2/14 - Labeled all of the instruments on the instrument panel and the center console with a label maker. Double checked the wiring and started the engine to insure everything worked OK. Total Time = 4 hours.
 |
| All Instrumenents Labeled |
11/15/14 - Placed all engine side wires in wire looms and secured using adel clamps and tie-wraps. Total Time = 4 hours.
 |
| All Wires in Wire Looms Secured with Clamps |
11/22/14 - Widened the pass-through area on the firewall in order to accomodate pass-throughs for wiring and cables. Also installed the A/F Ratio Innovator Module on the cabin side of the firewall. Total Time = 3 hours.
 |
| A/F Innovator Module Mounted |
11/29/14 - 11/30/14 - Installed (3) nylon bulkhead fittings on the firewall and routed all associated wiring and cables through the bulkhead fittings. Also encased wires on the cabin side into wire looms. Total Time = 8 hours.
 |
| All Wires and Cables Routed Through Nylon Pass-Throughs |
12/6/14 - Installed Fire Sleeve pieces into gaps in the nylon bulk head fittings. Also Drilled a hole into the right seat channel and installed a rubber grommet for the flap motor wires and any other wires to pass through. Total Time = 3 hours.
 |
| Hole Drilled with Grommet Installed for Flap Motor Wires |
12/7/14 - Wired up the flap motor switch on the instrument panel and verified proper movement of the flap motor when the switch is activated either up or down. Total Time = 3 hours.
 |
| Flap Motor Switch Wired Up and Verified for Proper Operation |
12/20/14 - Wired up the closed ciruit camera to the display through the selector switch and verified operation of the fuel sight tube camera for the header tank. Total Time = 3 hours.
 |
Sight Tube Camera Operation Verified
|
1/24/15 - Drilled holes in the floor for pass-through bulk head fittings for the brake lines. Installed the bulk head fittings and the parking brake valves for both the L.H. & R.H. parking brakes. Total Time = 4 hours.
 |
| Parking Brakes Installed |
1/25/15 - Attached the brake lines from the bulk head fittings and then ran the lines all the way through the channel under the floor to the main landing gear brakes. Also ran the brake lines from the pilot brake cyclinders to the passenger cylinders as well as to the parking brake valves. Total Time = 5 hours.
 |
| Connecting Brake Lines |
 |
| Brake Lines Attached to Main Landing Wheel Brakes |
3/7/15 - Replaced elbow fittings on the brake cylinders with straight fittings in order to have a straighter run of the brake lines from the left side to the right side of the brake cylinders. Used the elbow fittings to connect the L.H. and R.H. brake assemblies on the pilot and passenger wheels. Total Time = 3 hours.
 |
| Brake Lines Reworked |
 |
| L.H. & R.H. Brake Assemblies Connected |
3/8/15 - Replaced the fiber shock bungee with a steel bungee for a more robust design of the front landing gear suspension. This should also aid in making the rudder pedals easier to push by removing the downward pre-load on the nose strut. Total Time = 6 hours.
 |
| Adding the Steel Spring |
 |
| Steel Bungee in Place |
3/21/15 - Fabricated an access panel for the right baggage floor. Total Time = 3 hours.
 |
| R.H. Access Panel for Baggage Floor |
3/22/15 - Fabricated an access panel for the left bagge floor. Re-fabricated the access cover for the left seat base to provide for a better fit. Also installed a stiffener for the L.H. & R.H. throttle cables so there is less flex on the instrument panel. Total Time = 5 hours.
 |
| All Access Panels Fabricated |
 |
| Throttle Cable Stiffener Added |
3/28/15 - Received upholstery kit from Zenith today. Just placed items into interior to get an idea of what the final look would be.
 |
| Front View |
 |
| Side View |
3/29/15 - Wired up the left and right fuel tank gauges and verified operation by hooking up the wire to the float switch in the wing tank. Total time = 3 hours.
 |
| Fuel Gauges Working |
4/3/15 - Drilled holes in the baggage floors and installed grommets. Measured and cut the wires for the wing lights and the fuel hose to the points where the wings will attach to the fuselage. Total time = 2 hours.
 |
| Grommets Installed in Baggage Floor |
 |
Fuel Hose and Wires Prepared for Wings
|
4/19/15 - Replaced the Shorai battery with an Earth X battery for more cranking amps. The engine starts much easier now. Had to fabricate a new battery tray for the battery since it is much smaller than the previous one. Total Time = 5 hours.
 |
| What a size difference! |
4/25/15 - Drilled a hole in the cabin floor area to act as a drain in case there is a fuel leak where the fuel pumps are located. Covered the hole with screening material to keep any pesky critters out. Total Time = 1 hour.
 |
| Riveted Screen Over Drain Hole. |
5/2/15 - Drilled holes in upper cabin frame to attach "Y" shoulder harness. Total time = 1 hour.
 |
| Holes Drilled for "Y" Shoulder Harness |
5/9/15 - Wired up the Air/Fuel Ratio Meter and calibrated it so it will read correctly. Also installed the O2 sensor in the exhaust muffler and tie-wrapped the excess cable out of the way of the hot exhaust. Total Time = 4 hours.
 |
| A/F Ratio Meter Installed |
 |
| O2 Sensor Installed |
5/11/15 - Wired up the vibration activated hour meter to the the ignition key switch. Total Time = 2 hours.
 |
| Installing Hour Meter |
 |
| Vibration Activated |
5/16/15 - Drilled holes and fabricated a backplate for the mounting of the transponder antenna. Mounted the antenna and caulked around the edges. Total Time = 2 hours.
 |
| Backplate Fabricated and Attached to Antenna |
 |
| Transponder Antenna Attached to the Underside of Fuselage |
5/17/15 - Fabricated connector and wired up the positive and negative wires for the transponder unit to the distribution panel. Hooked up the antenna wire and powered up the unit to verify proper operation. Total Time = 6 hours.
 |
| Transponder Unit Working Properly |
5/23/15 - Fabricated bracket to hold the headphone extension jack on the side of the torque tube bearing channel. Riveted nut plates on bearing channel to hold brackets.
Total Time = 5 hours.
 |
| Headphone Extension Jacks Installed on Side of Bearing Channel |
5/24/15 - Drilled holes in top of fuselage for radio antenna and installed antenna. Ran wiring for antenna and verified proper operation of the radio. Also installed a music jack on the instrument panel next to the radio. Total time = 5 hours.
 |
| Radio Antenna Installed |
 |
| Radio Wiring Completed |
 |
| Music Jack Installed and Radio Operation Verified |
5/31/15 - Drilled access holes in the side of the Flaperon Control Covers. Access holes will help when attaching the vertical flaperon control rod hardware. Total Time = 2 hours.
 |
| Access Holes Drilled in Side of the Flaperon Control Covers |
 |
| Plastic Cover in Place |
6/20/15 - Installed the wiring for the navigational, landing and strobe lights. Total time = 6 hours.
 |
| Wiring Completed for Nav, Landing & Strobe Lights |
6/27/15 - Access hole cut into the Pilot Side Seat Base in order to access wiring and electronics. Total Time = 3 hours.
 |
| Access Hole Cut in Pilot Side Seat Base |
7/4/15 - Riveted the Arm Rest Sides to the bottom of the fuselage. Added an additional Adel clamp for ther fuel line under the fuselage. Total Time = 6 hours.
 |
| Arm Rest Sides Riveted in Place |
 |
| Additional Adel Clamp Added to Fuel Line |
7/5/15 - Riveted the Inboard Seat Belt Attachments onto the Gear Channel. Total Time = 2 hours.
 |
| Inboard Seat Belt Attachments Riveted to Gear Channel |
7/11/15 - Sanded, cleaned and painted the passenger and pilot seat backs. Total Time = 4 hours.
 |
| Seat Backs Painted |
7/12/15 - Drilled the seat back supports and riveted them to the seat pans. Positioned the seat pans onto the seat bases. Total Time = 4 hours.
 |
| Seat Back Supports Attached to Seat Pans |
 |
| Seat Back Supports & Seat Pans in Place |
7/18/15 - Removed the Header Tank and replaced the sight tube on the side of the header tank. Marked the tube with graduations so there is a visual display of the fuel quantity. Total Time = 3 hours.
 |
| Header Fuel Tank Marked |
7/19/15 - Removed the fuel pumps and wiring from area under the passenger seat. Applied the "Right Stuff" sealant to the sides of the area to prevent any leakage of fuel into the passenger compartment. Total Time = 4 hours.
 |
| Sealant Added to Area under Passenger Seat |
7/ 25/15 - Reinstalled the fuel pumps and wiring to the area under passenger seat. Wrapped all hoses and wiring in wire loom to protect against chaffing. Total Time = 2 hours.
 |
| Fuel Pump Hoses & Wiring Wrapped in Wire Loom |
7/26/15 - Reinstalled header tank and cut a floor mat to fit the passenger area in the cockpit. Total Time = 3 hours.
 |
| Header Tank Installed With Floor Mat |
8/15/15 - Completed final riveting of the rear wing attachment and the top channel. Also performed final riveting of the flaperon control cover. Total Time = 3 hours.
 |
| Rear Wing Attachment Final Riveting |
8/16/15 - Completed final riveting on both sides of the fuselage. Also completed final riveting on the top of the fuselage. Total Tinme = 4 hours.
 |
| Fuselage Sides Final Riveting |
8/29/15 - Fitted the Door Sill (75F12-6). Also fitted the Top Window Rib (75F17-6) and the Top Tinted Aerodynamic Window (75F17-2/1). Total Time = 4 hours.
 |
| Fitted the Top Window, Door Sill, Top Window Rib and Front Windshield |
8/30/15 - Fitted the front windshield and trimmed the excess material for a close fit. Total time = 3 hours.
 |
| Front Winshield TRimmed |
9/6/15 - Drilled holes into the tubing frame, Door Sill (75F12-6) and Top Window Rib (75F17-6). Deburred all holes, treated with anti-corrosion protection and then riveted all parts together. Total Time = 5 hours.
 |
| Riveted Door Sill and Top Window Rib |
 |
| Finished Riveting Pieces Together |
9/12/15 - Cut a portion of the Forward Top Skin to provide an access area for the steel bungee and riveted (6) nut plates in place. Total time = 2 hours.
 |
| Forward Top Skin Access Area |
9/13/15 - Installed the Bent Strip (75F12-3) on the ledge of the Pilot and Passenger side of the Cabin Skin. Total Time = 4 hours.
 |
| Drilling Holes For the Bent Strip |
 |
| Bent Strip Riveted to the Cabin Skin |
9/19/15 - Drilled and clecoed the Windshield in place in order to prepare for transporting the fuselage to the hangar. Total Time = 2 hours.
 |
| Windshield Clecoed in Place |
Total Cabin Finishing Time = 210 Hours.