Friday, December 2, 2011

Slats

Right Inboard Slat

Slat Rib

Ribs Clecoed to Skin
 11/19/11 - Installed Corner Doubler (75S1-6) inside Inboard Slat Skin (75S1-2) and clecoed in place. Drilled out holes with #40 drill bit. Cut "L" angle to 120 mm, drilled holes at 50 mm and 85 mm and then cut flange to holes. Bent "L" angle and clecoed with Slat Support (75S1-4) to Slat Rib (75S1-SS). After deburring and applying corrosion protection, riveted rib together. Clecoed ribs to bottom of slat skin and drilled to proper size. Removed parts, deburred, cleaned and applied corrosion protection. Reassembled parts and pushed bottom of skin inside the top of the skin and clecoed ribs to the skin. drilled holes to proper size and then removed parts, deburred, cleaned and applied corrosion protection. Total time = 10 hrs.


Slat Skin Clecoed Together
11/20/11 - Reassembled parts and clecoed ribs to the skin. Riveted the ribs to the slat skin and then finished riveting remaining skin together. Total time = 1 hr.

Riveting Slat Together
11/27/11 - Cut out the Fiberglass Slat Tip (75S1-5) and clecoed tip into the inboard end of the right inboard slat. Drilled holes into slat tip to the proper size and riveted tip into place. Total time = 2 hrs. 


Slat Tips
 

Finished Inboard Slat
 Total Assembly Time = 13 Hours.

Right Outboard Slat


Deburring Holes Inside Skin

1/14/12 - Installed Corner Doubler (75S1-6) inside Outboard Slat Skin (75S1-3) and clecoed in place. Drilled out holes with #40 drill bit. Cut "L" angle to 120 mm, drilled holes at 50 mm and 85 mm and then cut flange to holes. Bent "L" angle and clecoed with Slat Support (75S1-4) to Slat Rib (75S1-SS). After deburring and applying corrosion protection, riveted rib together. Clecoed ribs to bottom of slat skin and drilled to proper size. Removed parts, deburred, cleaned and applied corrosion protection.
Reassembled parts and pushed bottom of skin inside the top of the skin and clecoed ribs to the skin. drilled holes to proper size and then removed parts, deburred, cleaned and applied corrosion protection. Reassembled parts and clecoed ribs to the skin. Riveted the ribs to the slat skin and then finished riveting remaining skin together.


Riveting Skin Together
Cut out the Fiberglass Slat Tip (75S1-5) and placed tip into the inboard end of the right outboard slat to be riveted later after installing landing lights.

Finished Right Outboard Slat

 Total Assembly Time = 8 Hours.

Left Inboard Slat


Ribs Riveted to Skin

 1/15/12 - Installed Corner Doubler (75S1-6) inside Inboard Slat Skin (75S1-2) and clecoed in place. Drilled out holes with #40 drill bit. Cut "L" angle to 120 mm, drilled holes at 50 mm and 85 mm and then cut flange to holes. Bent "L" angle and clecoed with Slat Support (75S1-4) to Slat Rib (75S1-SS). After deburring and applying corrosion protection, riveted rib together. Clecoed ribs to bottom of slat skin and drilled to proper size. Removed parts, deburred, cleaned and applied corrosion protection. Reassembled parts and pushed bottom of skin inside the top of the skin and clecoed ribs to the skin. drilled holes to proper size and then removed parts, deburred, cleaned and applied corrosion protection.


Drilling Holes to #40 Size

Reassembled parts and clecoed ribs to the skin. Riveted the ribs to the slat skin and then finished riveting remaining skin together.


Adding the Fiberglass Tip
Cut out the Fiberglass Slat Tip (75S1-5) and clecoed tip into the inboard end of the right inboard slat. Drilled holes into slat tip to the proper size and riveted tip into place.

Total Assembly Time = 7 Hours.

Left Outboard Slat


Deburring Holes in Doubler

1/16/12 - Installed Corner Doubler (75S1-6) inside Outboard Slat Skin (75S1-3) and clecoed in place. Drilled out holes with #40 drill bit. Cut "L" angle to 120 mm, drilled holes at 50 mm and 85 mm and then cut flange to holes. Bent "L" angle and clecoed with Slat Support (75S1-4) to Slat Rib (75S1-SS). After deburring and applying corrosion protection, riveted rib together. Clecoed ribs to bottom of slat skin and drilled to proper size. Removed parts, deburred, cleaned and applied corrosion protection.
Reassembled parts and pushed bottom of skin inside the top of the skin and clecoed ribs to the skin. drilled holes to proper size and then removed parts, deburred, cleaned and applied corrosion protection. Reassembled parts and clecoed ribs to the skin. Riveted the ribs to the slat skin and then finished riveting remaining skin together.

Total Assembly Time = 7 Hours.

Final Riveting
Cut out the Fiberglass Slat Tip (75S1-5) and placed tip into the inboard end of the right outboard slat to be riveted later after installing landing lights


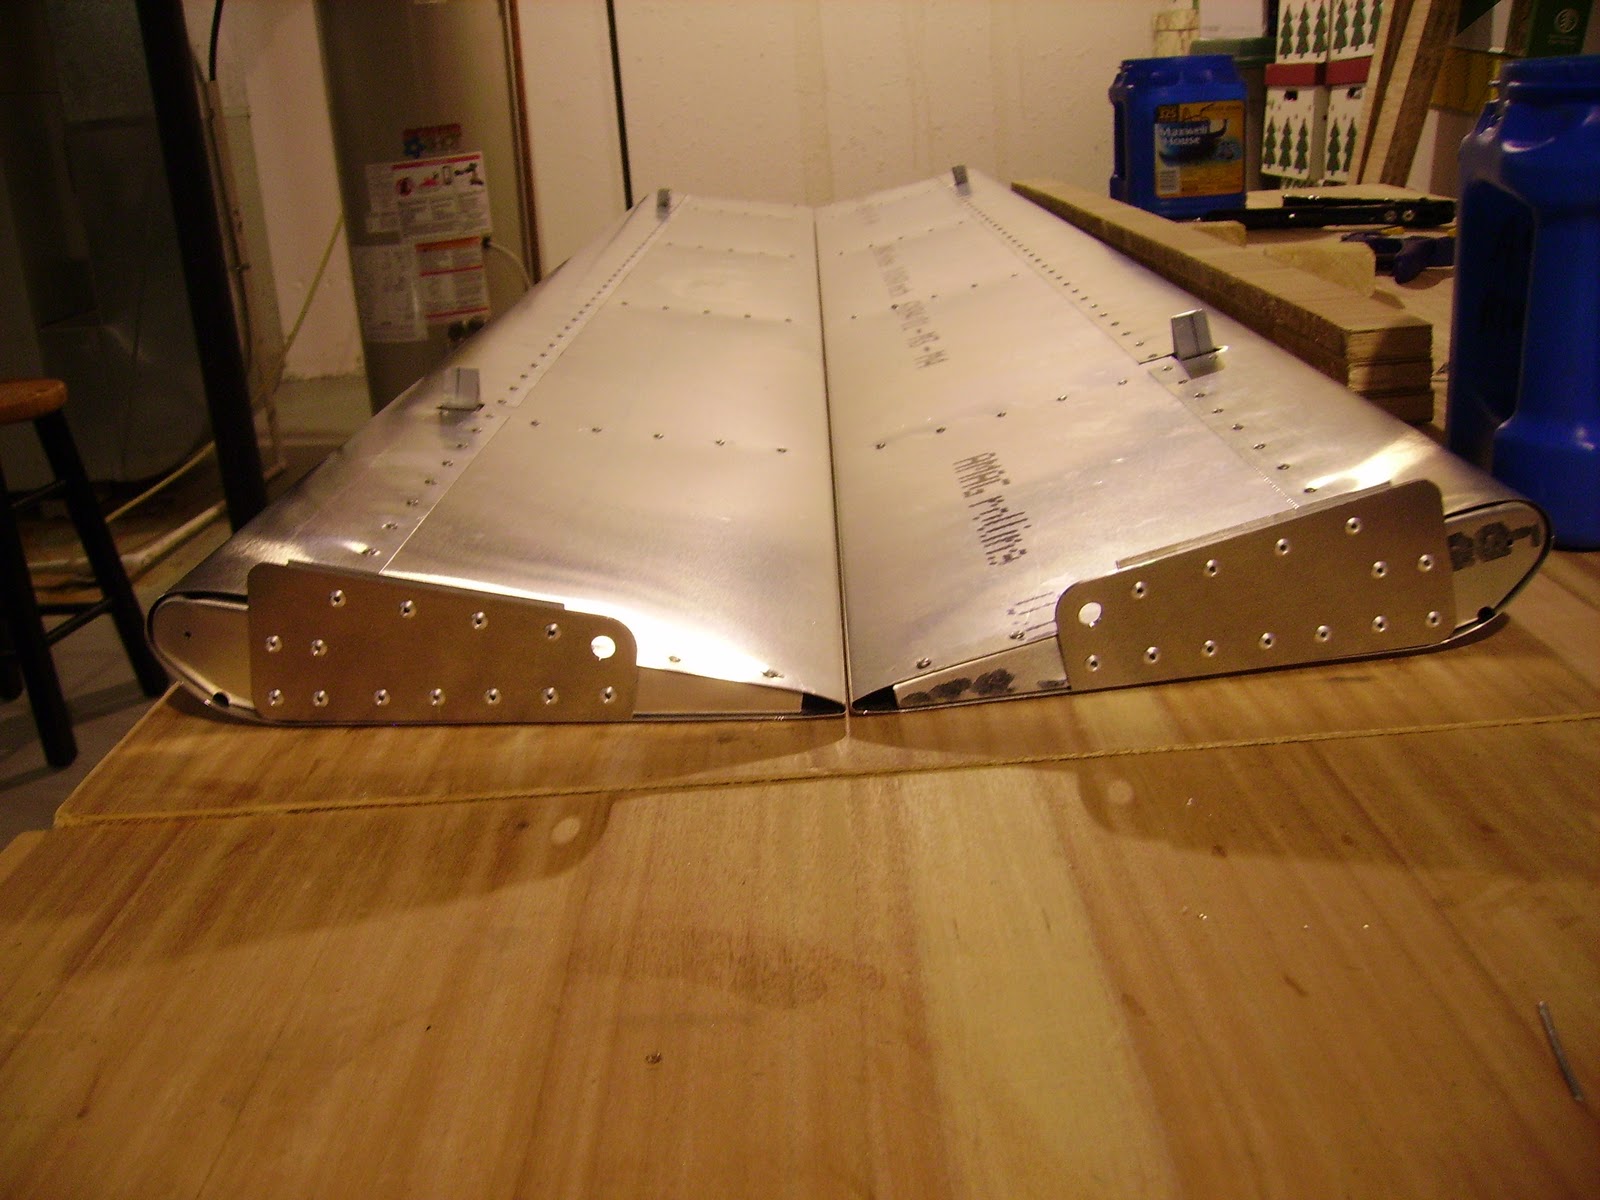
All Four Slats Completed!
 Total Slat Assembly Time = 35 Hours.

Friday, November 4, 2011

Flaperons

Right Inboard Flaperon

10/27/11 - Clecoed Flaperon Rear Ribs (75A1-3) and Flaperon Nose Ribs (75A1-2) to the Right Inboard Flaperon Spar (75A1-4). Drilled and attached hinge brackets to the spar with clecoes. Removed all parts, deburred, cleaned and coated parts with anti-corrosion material. Total time = 3 hrs.

Rear Ribs & Nose Ribs Clecoed to Spar
10/29/11 - Reassembled Flaperon Skeleton with clecoes and then riveted all parts together. Inserted skeleton inside the Flaperon Inboard Skin (75A1-8) and drilled and clecoed the Flaperon Full Rib (75A1-1), the Rib Angle (75A2-3) and the Flaperon Root Rib (75A1-1R) to the assembly. Attached the Flaperon Control Horn (75A1-6) and the "L" Angle to the Root Rib.  Removed all parts, deburred, cleaned and applied anti-corrosion material. Total time = 9 hrs.

Drilling Holes and Adding Clecoes
10/30/11 - Reassembled Flaperon assembly with clecoes then riveted skin to the spar and the ribs using the proper sized rivets. Total time = 4 hrs.

Riveting Skin to the Spar and the Ribs

Finished Assembly
 Total Assembly Time = 16 Hours.


Another Piece of the Puzzle Completed

Right Outboard Flaperon


Skeleton Clecoed
11/3/11 - Clecoed Flaperon Rear Ribs (75A1-3) and Nose Ribs (75A1-4) to the Right Flaperon Outboard Spar (75A1-5). Drilled and attached Hinge Brackets (75A2-1) to the spar with clecoes. Removed all parts from the spar, deburred, cleaned and coated parts with Cortec anti-corrosion material. Total Time = 3 hrs.


Riveting Skeleton Together
 11/4/11 - Reassembled skeleton with clecoes and then riveted the nose rib, rear rib and hinge bracket to the Flaperon Outboard Spar. Total Time = 2 hrs.


Drilling Holes in Skin
11/5/11 - Inserted the skeleton inside the Outboard Flaperon Skin (75A1-9) and clecoed the bottom to the spar and ribs. Expanded the holes with a #30 drill and clecoed together. Drlled and clecoed the Flaperon Full Rib (75A1-1) and Rib Angle (75A2-3) to the spar and skin. Disassembled all parts, deburred, cleaned and coated with Cortec ant-corrosion primer. Reassembled all parts with clecoes and riveted them together. Drilled and clecoed the Flaperon Tip (75A2-4), fitted it inside the skin and then riveted in place. Total Time = 8 hrs.


Finished Outboard Flaperon with Flaperon Tip

Total Assembly Time = 13 Hours


Another Milestone!
Left Inboard Flaperon

11/10/11 - Clecoed the Flaperon Rear Ribs (75A1-3) to the Left Inboard Spar (75A1-4). Clecoed the Flaperon Nose Ribs (75A1-2) to the Inboard Spar. Drilled and attached Hinge Brackets (75A2-1) to the spar with clecoes. Removed all parts from the spar, deburred, cleaned and coated parts with Cortec anti-corrosion. Total time = 3 hrs.

Drilling Holes Into Skin
11/11/11 - Reassembled skeleton and riveted the nose ribs, rear ribs and hinge brackets to the inboard spar. Inserted the skeleton inside the Inboard Skin (75A2-3). Attached the Flaperon Full Rib (75A1-1), Rib Angle (75A2-3), Control Horn (75A1-6), Root Rib (75A1-1R) and "L" Angle. Drilled Holes to proper size then disassembled, deburred, cleaned and added corrosion protection. Total Time = 5 hrs.

Clecoed Flaperon Bottom Skin
 11/12/11 - Inserted Skeleton inside the Inboard Skin and riveted the Rib Angle, Control Horn and "L" Angle to the skeleton and skin. Pulled the nose skin over and clecoed in place and completed riveting of the skin to the skeleton. Cleaned up work table. Total Time = 4 hrs.

Total Assembly Time = 12 Hours.

Left & Right Inboard Flaperons
Left Outboard Flaperon
I finally broke down and purchased a cart from Harbour Freight to hold the collection of tools I had accumulated. (See following picture)

Finished Skeleton
 11/12/11 - Clecoed the Flaperon Rear Ribs (75A1-3), Nose Ribs (75A1-2) and Hinge Brackets (75A2-1) to the Left Outboard Spar (75A1-5). Removed all parts, deburred, cleaned and coated with Cortec Anti-corrosion material. Total Time = 3 hrs.

Deburring and Cleaning Parts
11/13/11 - Reassembled skeleton and riveted the Nose Ribs, Rear Ribs and Hinge Brackets to the Outboard Spar. Inserted the skeleton inside the Outboard Flaperon Skin (75A1-9) and drilled and clecoed the Full Rib and Rib Angle to the spar and then drilled and clecoed the skin to the skeleton. Removed all parts, deburred, cleaned and coated with anti-corrosion material. Total Time = 4 hrs.


Riveting Skin
11/14/11 - Reinserted skeleton inside the skin and riveted the skin to the skeleton. Dilled and clecoed the Flaperon Tip (75A2-4), fitted inside the skin and riveted in place. Total Time = 2 hrs.

Total Assembly Time = 10 Hours.

Completed Left & Right Flaperons
 Total Flaperon Assembly Time = 51 Hours

Wednesday, August 17, 2011

Elevator


Drilling and Attaching Clecoes
8/13/11 - Indentified parts for the elevator and laid them out on the assembly table. Drilled and clecoed the Elevator Inboard Rear Ribs (75T3-3I), Elevator Nose Ribs (75T3-2) and the Elevator Middle Ribs (75T3-3M) to the Elevator Spar (75T3-5). Drilled out Left Nose Rib Forward Tooling Hole with a step drill in order to fit a rubber grommet in the hole. Clecoed the Elevator Tip Rib (75T3-1) and the Elevator Rear Skins (75T4-3) to the Elevator Skeleton. Drilled and clecoed the Bent Strips (75T3-4) to each Tip Rib. Also drilled and clecoed the Elevator Hinge Pin (75T3-9) to each Tip Rib. Cut and drilled "L" angles and attached to the Rear Channel (75T3-10) and clecoed to the Inboard Rear Ribs. Total Time = 8 hrs.

Taping the Nose Skin in Place
8/14/11 - Trimmed the Middle Rib to the appropriate length. Trimmed the Elevator Trim Tab Channel (75T4-5) and inserted it into the Elevator Skeleton. Drilled and clecoed it into place. Removed clecoes along the leading edge on the spar. Inserted the Elevator Nose Skin (75T4-2) between the rear skin and spar. Tightened the Nose Skin and taped in place. Drilled and clecoed the Elevator Nose Skin to the Elevator Skeleton. Total Time = 6 hrs.

Drilling & Adding Clecoes
8/20/11 - Elevator Horn Assembly. Attached Upper Elevator Horn (75T3-8) and Lower Elevator Horn (75T3-7) to the Elevator Assembly with clecos. Drilled and clecoed Horn Angle (75T3-6) and "L" angle to the Elevator Assembly. Marked and trimmed "L" angle to match with the Upper and Lower Elevator Horns. Total Time = 4 hrs.
Nose Skin Clecoed in Place
9/10/11 - Drilled out and clecoed the nose skin to the proper size of A4 and A5 rivets holes for the area closest to the elevator horn. Total time = 4 hrs. 
 

Elevator Horn
 9/17/11 - Drilled and clecoed remaining holes in the nose skin to the proper rivet size. Cutout and trimmed the trim tab channel opening. Removed the nose skins for deburring the rivet holes and trimming to the proper size prior to riveting. Drilled and clecoed the trim tab hinge (75T4-6) to the elevator trim tab (75T4-4). Drilled and clecoed the trim tab hinge to the rear skin. Total Time = 8 hrs.

Elevator Trim Servo & Rod Clecoed in Place
9/24/11 - Placed the Trim Servo (T2-7A-TS) at the proper location on the Elevator Rear Skin, drilled and clecoed the Trim Servo in place. Found the midway point on the trim servo arm and cut the trim servo rod to 130 mm in order to install the rod from the trim tab hinge to the servo arm with the trim tab in the neutral position. Drilled out remaining holes in the elevator skeleton and the elevator horn assembly. Removed all clecoes, trimmed elevator parts and deburred all drilled holes . Total time = 11 hrs.

Deburring, Cleaning and Applying Anti-Corosion Protection
9/25/11 - Cleaned all surfaces and coated with anti-corrosion protection. Re-assembled elevator skeleton and riveted together. Re-attached top and rear skins to skeleton with clecoes. Soldered wires from the servo motor to the 5 foot length of the 5 wire electric cable. Drilled and clecoed the cable clamps to the elevator main spar and routed the 5 wire cable through the cable clamps. Total time = 5 hrs.
   

Servo Trim 5-Wire Clamped in Place
 10/1/11 - Trimmed the hinge pin 3/4 of an inch shorter than the trim tab hinge and re-inserted pin back in the barrel of the hinge. Re-attached the horn assembly to the skeleton. Total Time = 3 hrs.


Riveting Skins onto Skeleton
10/1/11 - Reattached the nose skins to the skeleton and riveted them in place. Riveted the top and rear skins to the skeleton. Riveted the trim tab hinge to the trim tab. Riveted the trim tab horn to the trim tab. Attached the trim tab horn to the servo arm with the provided linkage. Total Time = 8 hrs. 

A Thing of Beauty!

Elevator Complete
10/9/11 - Filed down the horizontal stabilizer horn so the elevator could rotate freely without hitting the nose skin. Total Time = 2 hrs.

Attaching the "L" Angle to the Horizontal Stabilizer Bottom Skin
10/23/11 - Aligned elevator hinge brackets (75T2-7) on the hinge pin and drilled and clecoed brackets to the horizontal stabilizer. Aligned the elevator so the ends were equal distant on the horizontal stabiler. Filed down more of the horizontal stabilizer horn so the elevator completely pivots on the hinges with free travel throughout. Attached the "L" angle to the horizontal bottom skin. Total Time = 5 hrs.
Elevator Joined to the Horizontal Stabilizer
   Total Elevator Assembly Time = 64 Hours


Wednesday, August 3, 2011

Horizontal Stabilizer

7/30/11 - Time to start the next assembly, the Horizontal Stabilizer. I installed the front and rear spar upper doublers (75T2-1), rear spar lower doubler (75T2-3) and the front spar lower doubler (75T2-2) to the horizontal stabilizer rear spar (75T1-5) as well as the horizontal stabilizer front spar (75T1-4). Drilled and clecoed in place using 1/8" clecoes. After that I cut "L" angles to the ends on the front spar. Drilled holes and clecoed the horizontal stabilizer front brackets (75T2-4) to the front spar. I drilled and clecoed the horizontal stabilizer rear ribs (75T1-3) to the front spar. Then I clecoed the rear spar the the rear ribs, drilled and clecoed the horizontal stabilizer nose ribs (75T1-2) to the front spar and trimmed the "L" angles and clecoed the tip ribs (75T1-1) to the rear spar. Ta Da! The skeleton was completed! Total Time = 8 hrs.

Drilling & Putting in Clecos
(See my helper in the bottom right corner)
Horizontal Stabilizer Skeleton: Rear Spar (75T1-5), Front and Rear Spar Upper Doublers (75T2-1), Rear Spar Lower Doubler (75T2-3), Front Spar (75T1-4), Front Spar Lower Doubler (75T2-2), "L" Angles, Front Brackets (75T2-4), Rear Ribs (75T1-3), Nose Ribs (75T1-2) and Tip Ribs (75T1-1).


Putting the Skeleton Together

7/31/11 - Time for the skin. Placed Horizontal Stabilizer Skin (75T4-1) onto the skeleton. Drilled and clecoed holes into the skin for an A4 size. Turned the whole structure upside down and started to pull skin over the rest of the skeleton using tie-down straps. Whew! Pulled skin tight onto the structure with the aid of the lumber so as not to damage the aluminum skin with the tiedown buckles. Found the centerlines that I had drawn on the flanges appearing through the pre-drilled pilot holes. Drilled and clecoed holes to A4 size and removed tie-down straps and lumber. Drilled out remaining holes to A4 size. Total Time = 7 hrs.


Pulling the Nose Skin in Place


Nice and Tight!
Trimmed Rear Bracket (75T2-5) using left & right hand cutters and then filed down smooth. Attached Center Hinge Bracket (75T2-7) and the Center Hinge Gusset (75T2-8) to the rear bracket with clecos. Total Time = 3 hrs.

Horizontal Stabilizer Skinned
8/6/11 - Filed rough edges off and smoothed the cut edges of the horizontal stabilizer rear bracket with Scotch Brite. Drilled holes to proper size and clecoed rear bracket assembly into place onto the rear spar. Completely disassembled the Horizontal Stabilizer to prepare aluminum for riveting. Deburred all holes and smoothed all surfaces of metal. Used Scotch Brite to rough up surfaces to accept anti-corrosion Cortec primer. Total Time = 12 hrs.

Applying Anti-Corrosion Cortec Primer

 8/7/11 - Reassembled Horizontal Stabilizer skeleton with clecos. Riveted rear bracket onto rear spar and attached top & bottom of center hinge bracket with (2) AN3-5A bolts, washers and nuts. Placed horizontal stabilizer skin onto skeleton and clecoed into place. Riveted skin to skeleton and removed all clecos. Total Time = 6 hrs.


Attaching Horizontal Stabilizer Horn

Total Horizontal Stabilizer Assembly Time = 36 hours.

Finished Horizontal Stabilizer.

Onward & Upward to the Elevator!