Monday, November 4, 2013

Engine Assembly

Engine Installation

11/3/13 - Attached the engine mounting bracket to the firewall with appropriate bolts, washers and nuts. Torqued the bolts to 24 lb. ft. Total Time = 1 hour. 


Engine Mounts Torqued to Specifications
11/10/13 - Assembled the engine hoist and used tie-down straps to lift the engine from the mini-pallet. Rolled the engine hoist with engine into place and aligned the engine to the mounting bracket bolt locations. Loosely tightened the engine to the engine mount with rubber dampers, large area washers, small washers and nylon locking nuts. Total Time = 4 hours.


Engine Hoisted Into Place

Now the Real Fun Begins
11/15/13 - Mounted the Cabin Heater to the inside of the Firewall Rear Reinforcement using the supplied through bolts from the heater assembly. Total Time = 3 hours.

Cabin Heater Mounted
11/17/13 - Installed the High Pressure Fuel Filter to the engine side of the firewall on the pilot side. Fabricated the Lower Battery Tray from "L" angle and riveted it to the firewall on the passenger side. Drilled holes and mounted the battery "L" brackets for the upper battery position. Total Time = 4 hours.


Battery Tray Fabricated
11/26/13 - Torqued the engine mounting bolts to 24 lb. ft. and paint marked the bolt heads to detect any movement at later inspection intervals.Mounted the crankcase vapor collection canister and the contactor for battery# 1 on the firewall. Total Time = 4 hours.
Engine Mounting Bolts Torqued to Specifications

Oil Vapor Collection Canister
11/30/13 - Mounted the 50 amp fuse and the contactor for battery# 2 on the firewall. Mounted the ground bus on the firewall. Cut a hole on the pilot side of the firewall for the ECM connector and the MAP hoses to fit through. Total Time = 5 hours.
50 Amp Fuse and Battery Contactor for Battery# 2 Mounted

Cutout for the ECM Hoses and Connector
12/1/13 - Located the Header Tank in the cabin area in front of the passenger seat. Marked and drilled a hole in the floor for the drain plug to fit through. Also drilled holes in the Seat Channel for the Header Tank fittings to fit through. Total Time = 4 hours.
Holes Drilled for the Header Tank Fittings
12/4/13 - Fabricated Header Tank brackets to hold the Header Tank in place. Drilled holes in the floor and fitted the header tank brackets in place. Total Time = 3 hours.

Header Tank Brackets Fabricated
12/15/13 - Located the position of the Fuel Pump Assembly under the passenger seat pan. Drilled a hole in the Right Arm Rest for the supply fuel line to pass through. Drilled holes in the floor for mounting the Fuel Pump Assembly. Riveted nut plates to the underside of the floor and fastened the Fuel Pump Assembly to the floor. Total Time = 5 hours.

Fuel Pump Assembly Mounted to Floor
12/23/13 - Drilled a hole in the floor for the Fuel Pass-Through fitting. Mounted the fitting and the elbow with barbed fitting on the top and bottom of the floor. Total Time = 2 hours.


Fuel Pass-Through Fitting Mounted
12/27/13 - Mounted the Fuel Flow Meter and the fuel line from the fuel filter to the fuel rail with Oetiker clamps. Secured the fuel line with an Adel clamp attached to the firewall rail. Total Time = 3 hours.

Attaching the Fuel Line to the Fuel Rail with an Oetiker clamp
12/30/13 - Mounted the fuel line from the Fuel Pass-through under the floor to the High Pressure Fuel Filter on the Firewall using Adel Clamps. Total Time = 3 hours.

Fuel Line Run Underneath the Floor


Fuel Line Attached to High Pressure Fuel Filter
3/22/14 - After a long delay due to a very cold winter I was back at work in the garage. Drilled pass-through holes into the Seat Channel for the 9/16 inch fuel supply hoses from the wing tanks. Installed rubber grommets into the pass-through holes. Installed a fire sleeve over the fuel line from the fuel rail to the lower fuel tray. Total Time = 7 hours.
Pass-Through Holes Drilled with Rubber Grommets Installed
Fire Sleeve Installed Over High Pressure Fuel Line
3/23/14 - Installed Adel hose clamps on the fuel line to secure fuel hose in place. Cut 2 pieces of wire loom and installed on fuel hose to protect the fuel line from chaffing in the lower fuel tray. Installed the Oil Mist Tube from the Crankcase Breather Filter to the collection bottle. Also installed the Aluminum Condensation Versatube for the oil mist to collect and exit the lower part of the cowling area. Total Time = 4 hours.


Wire Loom Installed Over Fuel Line to Protect Against Chaffing


Oil Mist Tube Installed

3/30/14 - Cut fuel hose to the proper lengths and installed on the fuel pumps. Installed the visual indicator on the Header Tank Sight Gauge. Cut a length of "L" Angle and attached to the hose clamps for a hose protector. Total Time = 7 hours.

Fuel Hose Cut to Length and Attached to Fuel Pumps

Fuel Sight Gauge Added to Header Tank
4/6/14 - Fabricated an ECM (Electronic Control Module) bracket out of (2) "L" Angles for the engine computer. Installed brackets on cabin side ribs using rivet nuts. Total Time = 3 hours.


Engine Computer Mounted with "L" Angles
4/12/14 - Installed the heater supply line from the cylinder head area to the input side of the cabin heater using hose clamps and adel clamps to secure hoses.

Supply Heater Line Installed
Installed the heater return line from the coolant tower to the output side of the heater using hose clamps and adel clamps to secure the hoses. 
Heater Return Line Installed
Installed the coolant overflow tank. Installed the the coolant overflow tube from the overflow tank to the cooling tower. Wrapped the heater hoses wire wire loom to protect them from chaffing. Total Time = 6 hours.
Wire Loom Added to All Heater Hoses to Protect Against Chaffing
4/19/14 - After finding out that no one out there had a dual throttle control for a Viking Zenith 750 I decided to make one myself. I used aluminum cylinder stock and drilled a 10-32 threaded hole in the center of one end and then 2 threaded holes in the other end. I bought a 4 ft. and a 5 ft. A-800 friction lock throttle cable from Aircraft Spruce. I screwed the aluminum cylinder with the hole drilled in the center into the throttle body end. I then threaded both throttles into the other end of the aluminum stock. I used adel clamps to fasten the throttle cables in place so they wouldn't move at the crimped area of the throttle cables. Total Time = 3 hours.


Dual Throttle Attached With a Threaded Aluminum Cylinder
 
Adel Clamps used to Fasten Throttle Cables in Place

 Dual Throttle Actuator Video
Total Engine Installation Time = 71 Hours


Monday, October 14, 2013

Landing Gear


Nose Gear

10/6/13 - Drilled out the Bearing Block Assembly (75L1-7) and used a 1/4 x 28 tap to tap the holes for the bottom bolts. Also clecoed in place the Lower Bearing Support (75F12-5). Total Time = 3 hours.


Tightening the Lower Bearing Support Bolts

Tapping the Holes in the Bearing Block
 10/12/13 - Painted the Nose Gear Leg (75L1-1), the Toe Brake Linkage and Bungee Pin. Also drilled out the Nose Wheel Fork (75L1-2) to accept the Nose Gear Leg. Total Time = 3 hours.
 
Painting the Toe Brake Linkage
 10/13/13 - Assembled the front Nose Wheel Rim onto the Matco Tubeless Tire.  Also drilled  the holes to the proper size in the Lower Bearing Support and tightened down to the fuselage with the proper bolts. Installed the Nose Gear Leg in place and positioned the Shock Bungee over the pin on the Nose Gear Leg. Total Time = 4 hours.
Assembling the Nose Wheel Rim with Tire
Nose Gear Leg in Place
10/17/13 - Bolted the Nose Fork (75L1-2) to the Nose Gear Leg. Attached the Nose Wheel Axle (75L1-5/1) and the Axle Spacers (75L1-4) to the Front Wheel and bolted it to the bottom of the Nose Fork. Total Time = 1 hour.
Nose Gear Assembly Completed
10/26/13 - Used a rotary tool to notch areas on the Tundra Main Gear Spring (75L2-1) for the studs on the Gear Strut Fitting. Notched out both the Upper and Lower Support Rubbers (75L2-2) to clear the studs on the Gear Strut Fitting. Total Time = 8 hours.

Tightening the Nuts onto the Main Landing Gear Studs.
10/27/13 - Drilled (2) 1/2 inch holes in the Main Gear Support (75L2-3) and cut off the excess material. Installed the Top Support Rubber, Tundra Main Gear Spring, Bottom Support Rubber and the Main Gear Support. Tightened up the assembly with washers and lock nuts. Assembled the Tubeless Tire Assembly. Installed the Matco Main Gear Axle to the end of the Right Tundra Main Gear Spring. Installed the brake assembly and the Tire assembly onto the Right Main Gear Axle. Total Time = 7 hours.

Tire Assembly with Brakes Added To the Right Tundra Main Gear Spring
11/2/13 - Disassembled all tire assemblies and re-assembled with an RTV bead around the O-ring and the inner core to prevent any slow leak of air from the tires prior to mounting tires onto the fuselage. Total time = 4 hours.
Brake Assembly Added to the Left Main Gear Axle
 11/3/13 - Installed the Matco Main Gear Axle to the Left Tundra Main Gear Spring. Installed the brake assembly, hub and tire onto the Left Main Gear Axle. Removed the fuselage from the sawhorse and placed fuselage onto its own landing gear. Total time = 4 hours.

Hey Look Ma, It Stands On Its Own 3 Legs!
Total Landing Gear Assembly Time = 34 Hours

Thursday, May 30, 2013

Rear & Forward Fuselage Joining

Baggage Area

5/28/13 - Started riveting together the baggage compartment. Total Time = 1 hour.


Checking to See If My Hand Riveter Will Fit Into the Corner
 
6/1/13 - Riveted the back of the baggage compartment. Riveted the baggage upright and the extrusion arm of the forward fuselage to the rear fuselage side skin. Riveted the bottom extrusion on the forward fuselage to the cabin floor. Riveted the gear channel to the rear and forward fuselage. Total Time = 7 hours.

Riveting the Gear Channel to the Forward Fuselage

6/2/13 - Cutoff excess from the end of the top tubes of the Cabin Frame (75F15-1) so it would cleco to the rear wing attachment. Also trimmed the right front tube so it would cleco to the cabin side. Drilled the remaining holes in the cabin frame and into the rear wing attachment as well as the cabin side. Marked the rivet line on the Gear Strut Fitting (75F14-3) and then drilled holes into the gear strut fitting and into the fuselage. Total Time = 5 hours.

Cabin Frame Clecoed in Place
6/9/13 - Drilled all the holes in the Gear Strut Fitting to the proper size for all the bolts and the rivets. Drilled holes in the Gear Channel Doublers (75F10-2) and into the Gear Channel to the proper size. Total Time = 9 hours.

Gear Stut Holes Drilled to Size

Gear Channel Doublers in Place and Drilled to Proper Size

6/15/13 - Sanded, Primed and Painted the Gear Strut Fittings. Cut "L" Angles to 150 mm and placed against the cabin side and the Gear Channel. Drilled all holes to proper size and then deburred all parts, cleaned and coated parts with Cortec anti-corrosion . Total Time = 5 hours.

Painting the Gear Strut Fittings

6/16/13 - Positioned the Firewall flush with the edge of the cabin floor. Drilled holes through the cabin floor and into the Firewall. Postioned the Upper Engine Mount Fitting (75F14-2) and the the Lower Engine Mount Fitting (75F14-1). Drilled holes into the fittings, Firewall and the Longerons. Total time = 3 hours.

Firewall and Engine Mount Fittings in Place
7/1/13 - Made a trip to Viking Aircraft Engines in Edgewater, Fl. to pick up my new 110 HP aircraft engine to power my Zenith CH750 airplane. Bought a one-way airline ticket and rented a mid size SUV to drive it back to Michigan. Everything worked out just fine. It took 18 & 1/2 hours to drive back home but the driver and the cargo made it back in one piece. 
 
The Viking Team Loading the Engine into the Back of the SUV
Viking 110HP Engine Waiting Patiently for Installation. A Thing of Beauty!
7/5/13 - Riveted both the L.H. & R.H. Rear Seat Channels in Place. Also riveted the L.H. & R.H. Seat Supports in place. Bolted and riveted the L.H. & R.H Gear Strut Fittings and the L.H. & R.H. 150 mm "L" angles that are against the side skin to the Gear Strut Fittings. Total Time = 7 hours.

Riveting the Side Skin Gussets

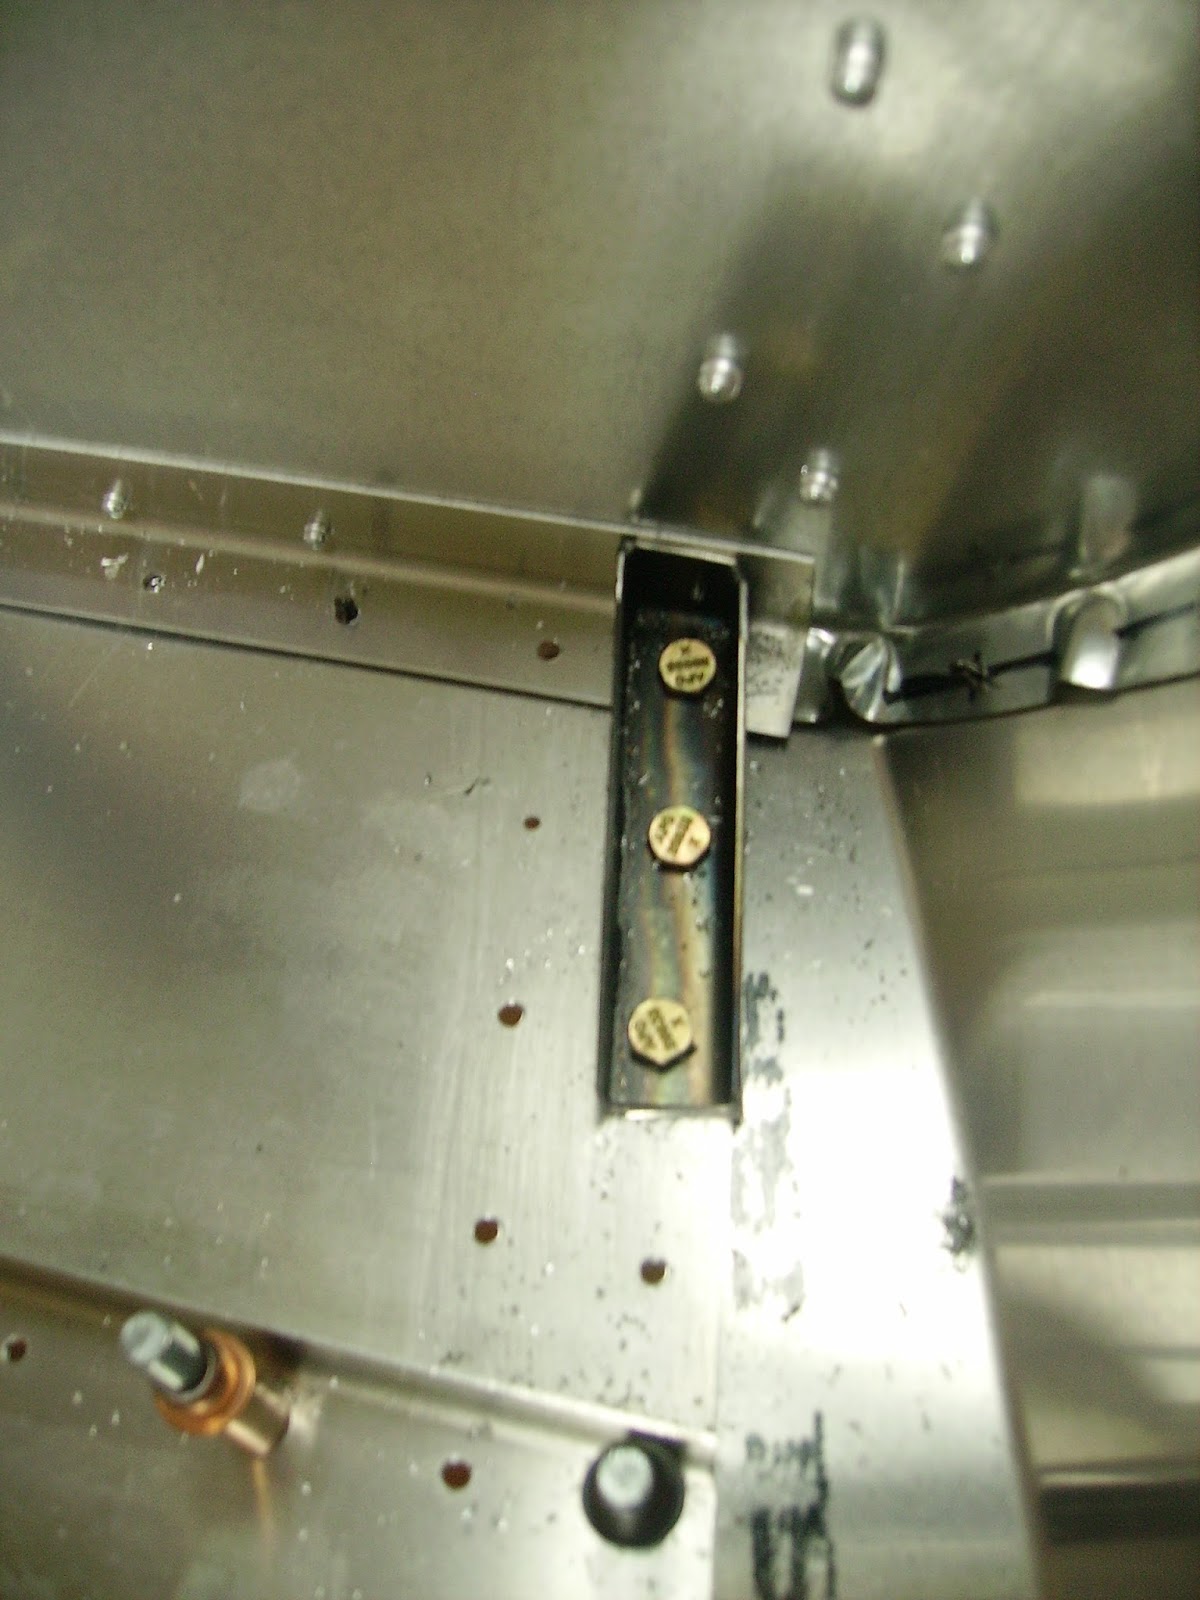
Gear Strut Fittings Bolted and Riveted in Place
7/6/13 - Drilled holes on the underside of the cabin floor into the firewall. Cut "L" angles to fit on the Left Front Side Skin and drilled holes after fluting the "L" angles to follow the curvature of the side skin. Total Time = 3 hours.

Clecoing the Foward Angles into Place
 7/7/13 - Finished installing the "L" angles onto the the right front side skin then installed the Heal Support Gusset (75F10-6). Installed the Forward Angles (75F12-7) onto the "L" angles after trimming them to fit and clecoed them in place. Total Time = 4 hours.

L.H. Side Installed with "L" Angles, Forward Angles and Heal Support Gusset
 7/13/13 - Cut "L" angles to fit onto the Left Front Side Skin. Installed the Forward Angles (75F12-7) on the "L" angles on the L.H. Side Skin. Installed the Heal Support Gusset (75F10-6) on the L.H. side of the Heal Support. Drilled and clecoed all parts in place. Total Time = 5 hours.

Lower Engine Mount Fitting Drilled to Proper Size
 7/14/13 - Drilled all holes to the proper size in the Firewall, Sideskins, "L" Angles, Forward Angles, the Heal Support and Heal Support Gusset. Drilled the Upper and Lower Engine Mount Fittings to the proper size. Installed the L.H. and R.H. Cabin Frame Gussets (75F12-4) to the cabin side and the cabin frame then drilled these holes to the proper size. Total Time = 5 hours.

Cabin Frame Gusset Installed and Holes Drilled to Proper Size
 7/20/13 - Fitted the Instrument Panel (75F16-1) and the Forward Top Skin (75F16-2) into place with clecoes. Drilled holes from the Forward Top Skin into the Firewall and from the Side Skin into the Longeron and the Top Skin. Cut "L" Angles to fit between the Firewall and the Instrument Panel. Drilled out all holes to the proper size. Total Time = 5 hours.
Forward Top Skin and Instrument Panel In Place and Drilled to Proper Size
7/21/13 - Drilled holes through the Forward Top Skin into the cabin frame. Took apart the the Forward Top Skin. Drilled the engine mounting holes to the proper size into the four corners of the Firewall and into the Lower and the Upper Engine Mount Fittings. Total Time = 3 hours.

Engine Mount Holes Drilled Into the Four Corners of the Firewall
7/27/13 - Drilled holes in the top flange of the Engine Bracket through the Firewall and into the Cabin Frame flange. Took off the Cabin Frame and the Firewall. Drilled holes to the proper size into the Rear Wing Attachment, Side Channel and the Top Channel. Removed the Top Channel Assembly for deburring. Total Time = 4 hours.
Top Channel and Rear Wing Attachment Drilled

7/28/13 - Deburred, cleaned and added Cotec anti-corrosion protection to the Rear Wing Attachments, Side Channels, Top Channel and Rear Channel. Reassembled the Top Channel Assembly and clecoed back in place. Sanded the Lower Engine Mount Fittings and then primed and painted them. Sanded the Upper Engine Mount Fittings, primed and painted them. Total Time = 7 hours.

7/29/13 - Sanded, primed and painted the Cabin Frame Gussets. Sanded the Cabin Frame and prepped it for painting. Total Time = 2 hours.
8/4/13 - Deburred the L.H. & R.H. Forward Side Skins, Forward Angles, "L" Angles,  Instrument Panel, Forward Top Skin, Heal Support Gussets, Forward Fuselage Assembly and the Firewall. Painted the Firewall with heat resistant paint. Total Time = 4 hours.

Firewall Painted
8/10/13 - Primed cabin frame with self-etching primer. Painted the cabin frame with silver paint. Total Time = 2 hours.

Cabin Frame Painted
8/17/13 - Deburred, cleaned added corrosion protection to forward fuselage parts. Total Time = 3 hours.
Front Fuselage Parts Deburred, Cleaned and Corrosion Protected

8/18/13 - Reassembled front fuselage parts and started riveting the forward angles and the "L" angles to the front fuselage side skin. Total Time = 7 hours.

Reassebling the Front Fuselage
9/29/13 - Installed the passenger toe brake cylinder supports (6B9-6). Drilled, deburred, cleaned and added corrosion protection. Total Time = 2 hours.

Passenger Toe Brake Supports Drilled and in Place
10/5/13 - Riveted the L.H. & R.H. Forward Side Skins to the firewall and the Forward "L" Angles. Riveted the Brake Cylinder Supports for the both the pilot and passenger side. Also riveted the Heel Support Gussets. Total Time = 3 hours.

Riveting the Side Skins in Place

Total Rear & Forward Fuselage Joining Assembly Time = 96 Hours.